
A burden is the percentage of pay rate that the employer/staffing company has to pay in taxes, including work comp, etc. Bilflo allows you several different ways to set up your burdens.
Log in to your company’s Bilflo Admin account.
From the navigation menu, go to Settings > Burdens.
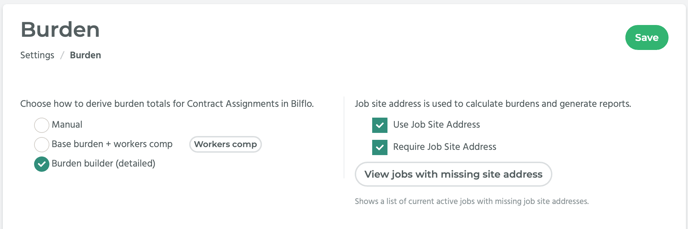
On the Burden page you can choose how to derive burden totals for Contract Assignments in Bilflo.
There are three options available:
- Manual, which only requires you to enter a burden percentage that you have predetermined on the new contract job page. This is the simplest version of burdens in Bilflo and does not require any additional setup;
- Base Burden + Workers Comp, which requires you to set the base and minimum burden amounts, and add Workers Comp Codes and Rates; and
- Burden Builder, where you create and/or select the various types of burdens you wish to add to the contract job. NOTE: Unemployment rates (federal as well as by state), a Medicare rate, and a Social Security rate are included in Bilflo, but you will need to add your own Workers Comp codes.
Manual
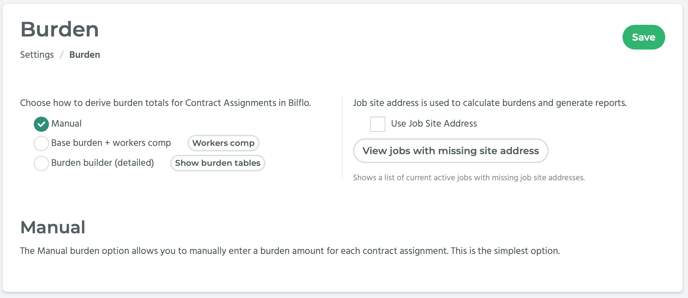
On the Burden page, select the “Manual” radio button.
Click on the Save button to save your changes.
Now, when you create a new contract job, you will be able to enter your burden amount in the Burdens section of the form.
Base Burden + Workers Comp
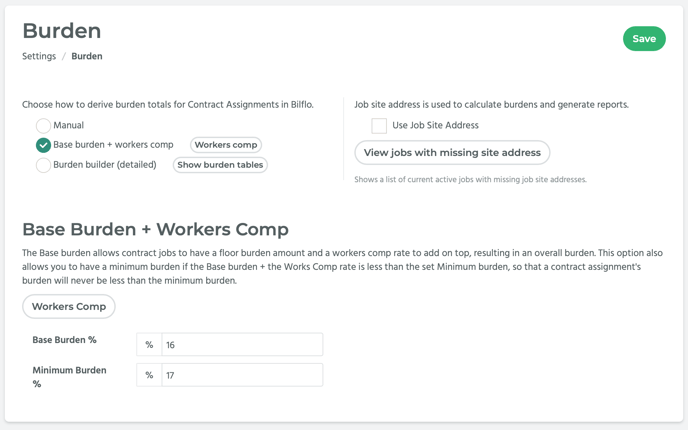
On the Burden page, select the “Base burden + workers comp” radio button, then click Save.
The page changes to reflect your choice. You can enter the base burden and minimum burden in the available fields.
Base burden and minimum burden are a global setting so they won’t change per assignment. The base burden is similar to the manual setting, in that you enter an amount you have predetermined. The minimum burden is the minimum rate that the calculated burden rate can be for an assignment.
The total burden rate is usually calculated from the base burden plus the workers comp rate. The greater amount, the base burden + workers comp rate or the minimum burden, will be used as the calculated rate in the assignment.
After you have entered the amounts, you can click on the Workers Comp button to add any necessary workers comp codes.
You will be taken to the Workers Comp page. Review the How to Add Workers Comp Codes article for information on how to add workers comp codes.
After you have added the workers comp codes, return to the Burdens page from the navigation menu, Settings > Burdens.
Ensure that “Base burden + workers comp” is still selected and that the Base Burden % and Minimum Burden % reflect what you want.
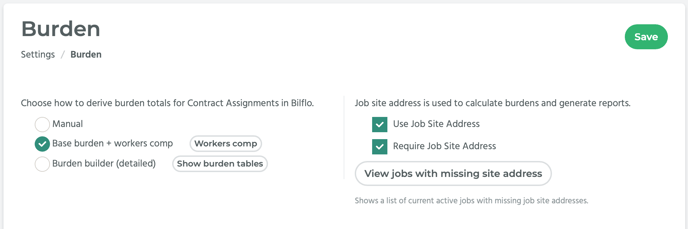
Checkmark “Use Job Site Address” and “Require Job Site Address.” This ensures that the correct burden rates are applied based on the state the client business is in and not the state that the contractor resides in.
Click on the Save button to save your changes.
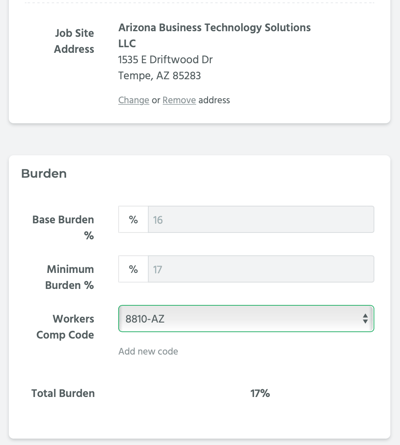
Now, when you create a new contract job, under Standard Job Info, make sure to select the job site address so you can select the appropriate workers comp code. Under the Burden section, the Workers Comp Code drop-down menu only shows codes available for the address entered under Standard Job Info.
Burden Builder
On the Burdens page, select the “Burden Builder” radio button.
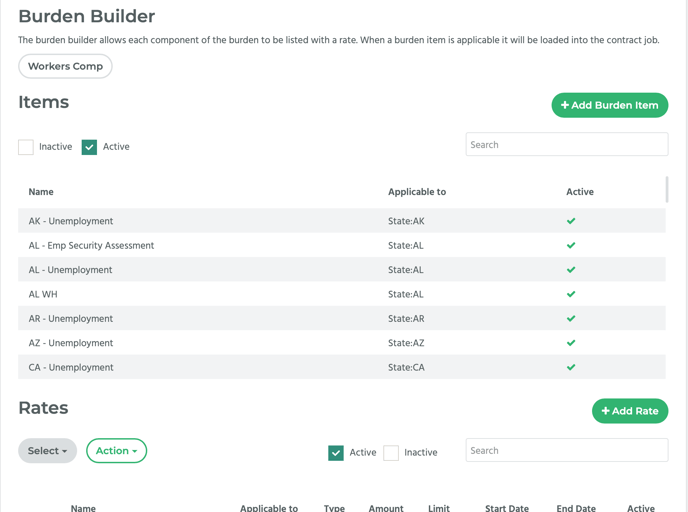
The page changes to reflect your choice. Now, there are two new sections that have been added to the page: Items and Rates. Here, you can view burden items and rates that are already entered into Bilflo, or add your own items and rates by clicking the Add Burden Item button or the Add Rate button.
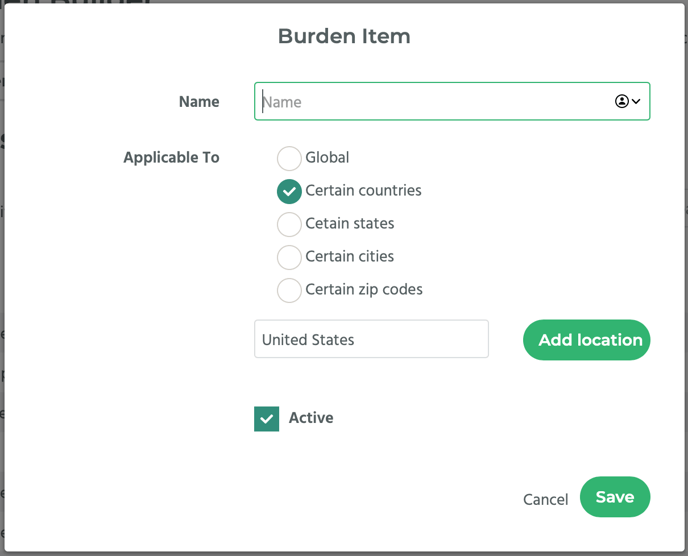
Click on the Add Burden Item button and a pop-up window titled, “Burden Item,” will appear. Enter the name of the burden item into the Name field, select the relevant radio button for where this burden is applicable (i.e. is it global, for a certain country, state, etc.), enter the specific location into the Location field, and click Add Location. You may add more than one location criteria to a burden item. Once you have finished, click on the Save button.
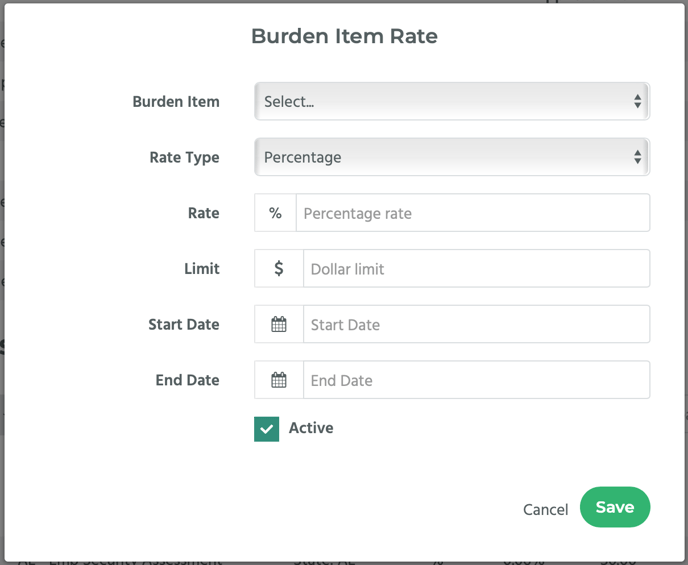
Now click on the Add Rate button. A pop-up window titled, “Burden Item Rate,” will appear. Select the name of the burden item you just created from the Burden Item drop-down menu. Select either “Percentage” or “Dollar Amount” from the Rate Type drop-down menu. Enter the percentage or dollar amount (depending on what rate type you chose) into the Rate field. Enter the Dollar Limit, the Start Date, and End Date (if applicable). NOTE: Some Global or Federal burden items may only have a start date. Ensure “Active” is check-marked, then click on the Save button.
Ensure that “Use Job Site Address” and “Require Job Site Address” are checkmarked, ensuring that the correct burden rates are applied based on the client’s job site address and not the state in which the contractor resides. Click on the Save button at the top of the Burden page to save your changes.

To add workers comp codes, click on the Workers Comp button under the Burden Builder header. This will take you to the Workers Comp Codes page. Review the How to Add Workers Comp Codes article for information on how to add workers comp codes.
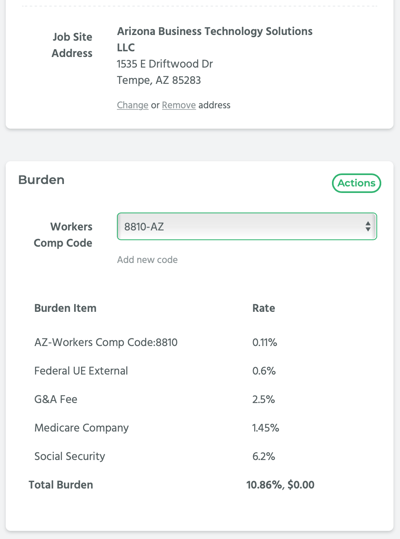
Now, when you create a new contract assignment, under Standard Job Info, make sure to select the job site address so the applicable burden items and workers comp codes will be added to the assignment accordingly. Under the Burden section, the Workers Comp Code drop-down menu only shows codes available for the state from the address entered under Standard Job Info. Note that an itemized list of applicable burden items was automatically added. These items were pulled in from the list of burden items you saw earlier based on the matching criteria from the Job Site Address.